

How To Install Snap In Capacitor
Play Music in Ionic Capacitor apps
In this mail service, you will learn how to play music in your Capacitor Ionic Athwart app, be information technology for a music histrion or just for a notification. Capacitor is the latest buzz in hybrid app world. It is created to be a replacement and an improvement over Cordova.
In this post, yous will learn
- How to play music and sound files in Ionic 4 apps — both from local files and web urls
- How to use music controls like next, previous, interruption etc.
This demonstration is supported by Ionic 4 Spotify Starter from Enappd. Complete source code of this tutorial is available hither — Ionic-iv-music (capacitor branch)
If you are looking for Music functionality in Ionic 4 Athwart Cordova apps, please bank check this weblog
Let's see a brief intro to each of the included frameworks:
- Ionic
- Capacitor
What is Ionic ?
Yous probably already know about Ionic, but I'grand putting information technology here just for the sake of beginners. Ionic is a hybrid mobile app development SDK. Information technology provides tools and services for developing hybrid mobile apps using Spider web technologies like CSS, HTML5, and Sass. Apps can be built with these Web technologies then distributed through native app stores. These apps can be installed on devices by leveraging Cordova or Capacitor surround.
And so, in other words — If you create Native apps in Android, you lot lawmaking in Coffee. If y'all create Native apps in iOS, you code in Obj-C or Swift. Both of these are powerful merely complex languages. With Cordova (and Ionic) you lot can write a single piece of lawmaking for your app that can run on both iOS and Android(and windows!), that too with the simplicity of HTML, CSS, and JS.
It is important to note the contribution of Cordova in this. Ionic is only a UI wrapper made up of HTML, CSS and JS. So, by default, Ionic cannot run as an app in an iOS or Android device. Cordova is the build environment that containerizes (sort of) this Ionic web app and converts information technology into a device installable app, along with providing this app admission to native APIs like Camera etc.
What is Capacitor ?
Cordova helps build Ionic web app into a device installable app. But there are some limitations of Cordova, which Capacitor tries to overcome with a new App workflow.
Capacitor is a cross-platform app runtime that makes it easy to build web apps that run natively on iOS, Android, Electron, and the web. Ionic people call these apps "Native Progressive Spider web Apps" and they represent the next evolution beyond Hybrid apps.
Capacitor is very similar to Cordova, but with some key differences in the app workflow
Here are the differences between Cordova and Capacitor
- Capacitor considers each platform project a source asset instead of a build time asset. That means, Capacitor wants you to keep the platform source lawmaking in the repository, unlike Cordova which always assumes that yous will generate the platform code on build time
- Because of the higher up, Capacitor does not utilise
config.xmlor a like custom configuration for platform settings. Instead, configuration changes are fabricated by editingAndroidManifest.xmlfor Android andInfo.plistfor Xcode - Capacitor does not "run on device" or emulate through the command line. Instead, such operations occur through the platform-specific IDE. And then yous cannot run an Ionic-capacitor app using a command similar
ionic run ios. You will take to run iOS apps using Xcode, and Android apps using Android studio - Since platform code is non a source nugget,y'all can directly change the native code using Xcode or Android Studio. This give more flexibility to developers
In essence, Capacitor is similar a fresh, more flexible version of Corodva.
Plugins in Capacitor
Cordova and Ionic Native plugins can be used in Capacitor environment. In this post also, nosotros will use Cordova-plugin-media to play music in Capacitor environment, which is wrapped by Ionic Native plugin besides.
However, there are certain Cordova plugins which are known to be incompatible with Capacitor.
Other than that, Capacitor likewise doesn't support plugin installation with variables. Those changes have to be done manually in the native code.
Where is music required in apps ?
Well ! that's a stupid question I know. Music is everywhere in today's apps. Spotify, Youtube Music, Wynk, Gaana, etc. Other than the music streaming apps themselves, there are tonnes of other usages of music/sound in apps.
- You definitely demand sounds in a game app
- You tin can play sounds when user does a specific activity in the app e.g. wins a coupon !
- Sounds can be played for push notifications, the ones which are silently pushed in a foreground app
- Chat messages tin can make a sound ! Whatsapp does that
- …… and many more than such examples
Basically music / sounds make your app more lively, more exciting. Of course you lot would desire to avoid sounds in a professional app like LinkedIn, because people use that at work every bit well 😄
Structure of Post
We'll follow a stepped approach to create a Music player app in this Ionic 4 Capacitor App. Post-obit are the steps
- Stride 1 — Create a basic Ionic 4 Angular app
- Pace 2 — Setup Music plugin
- Pace 3 — Sympathize and implement Music plugin Features
- Step four — Integrate Capacitor in the app
- Stride five— Test on Android
So allow's dive right in !
Footstep 1 — Create a bones Ionic 4 app
I accept covered this topic in detail in this blog.
In short, the steps you demand to take here are
- Make certain yous accept node installed in the system (V10.0.0 at the time of this web log post)
- Install ionic cliusing npm (my Ionic version is 4.6.0 )
- Create an Ionic app using
ionic start
You lot can create a blank starter for the sake of this tutorial. On running ionic start ionic-4-music blank , node modules volition exist installed. Once the installation is done, run your app on browser using
$ ionic serve
Make slight modifications to the home folio every bit yous like. My app's habitation page looks like this
I actually borrowed the homepage UI from Enappd's Ionic four Spotify starter, just to give y'all a glimpse of the UI and features.
Pace 2 — Setup Music plugin
Nosotros are going to use an Ionic Native plugin (which is substantially wrapping a Cordova plugin) — Cordova Plugin Media. This plugin has basic music playback functionalities, along with recording capabilities. But we'll non become into recording features for now.
In one case your basic app is gear up, install the plugin using following commands
$ ionic cordova plugin add together cordova-plugin-media
$ npm install @ionic-native/media
With this, the plugin is installed, no extra settings. Now you have to import the plugin in app.module.ts and your homepage i.eastward. habitation.page.ts
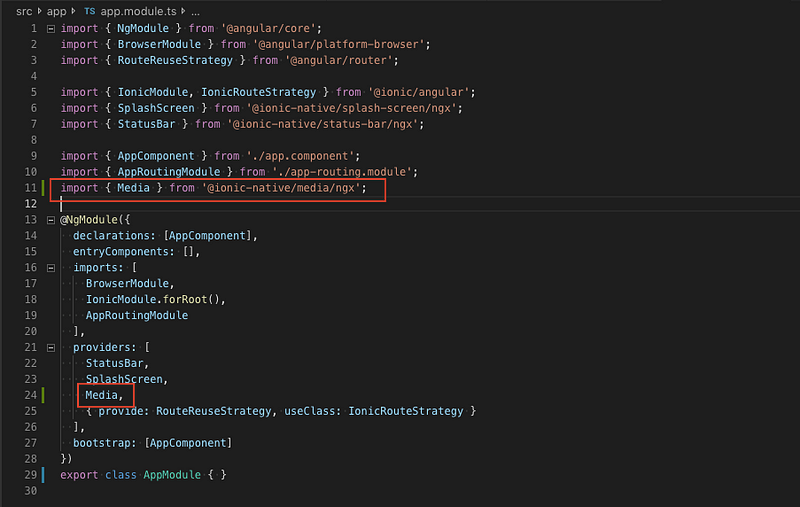
Similarly import the plugin in home.page.ts and declare information technology in constructor as
constructor(public platform: Platform, private media: Media) {} Step 3 — Diverse Music plugin Features
Now that he plugin is installed and imported correctly, nosotros move on to integrate its methods. Permit'due south have a wait at different methods the plugin supports
Complete source lawmaking of this tutorial is bachelor here — Ionic-4-music (capacitor branch)
Create Media
This is the basic routine the plugin needs to perform in order to import the song/audio file into the app. There are 2 means to provide music file to the plugin
- From a local url
- From a web url
From Local url —For demo purpose, I will use a local asset file. I have this file straight in assets binder.
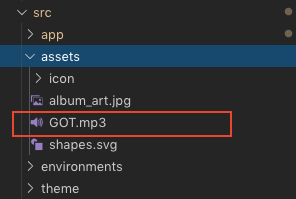
In Android devices, you lot demand to format the music file url like this/android_asset/public/assets/file.mp3 .
From Web url —You can likewise input a web url straight. Here's a URL for the song you tin can use (Please check if the URL notwithstanding exists, otherwise use whatever other mp3 URL)
http://fabienne.sigonney.free.fr/tranquilit/Eagles - Hotel California (Audio-visual).mp3
To create a playable media, you need to assign the media file to a variable via the create method of the plugin
this.curr_playing_file = this.media.create("YOUR_FILE_URL"); Now, this.curr_playing_file can be used throughout the page to play / suspension/ stop the song etc.
Play / pause
The almost bones function of a music player. The plugin allows yous to play or suspension a "created" media. The method could not take been simpler 😄
this.curr_playing_file.play();
Note — The plugin take a little time to load the media. Make sure you are not calling play() on an uncreated media variable.
Besides, Paused media plays from the same place it was paused.
getDuration
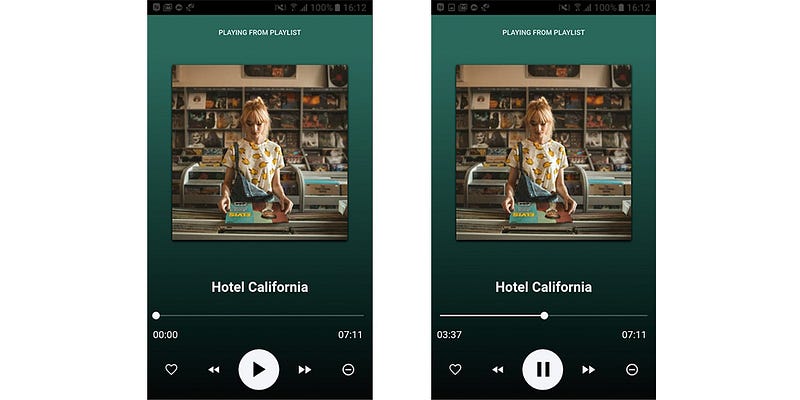
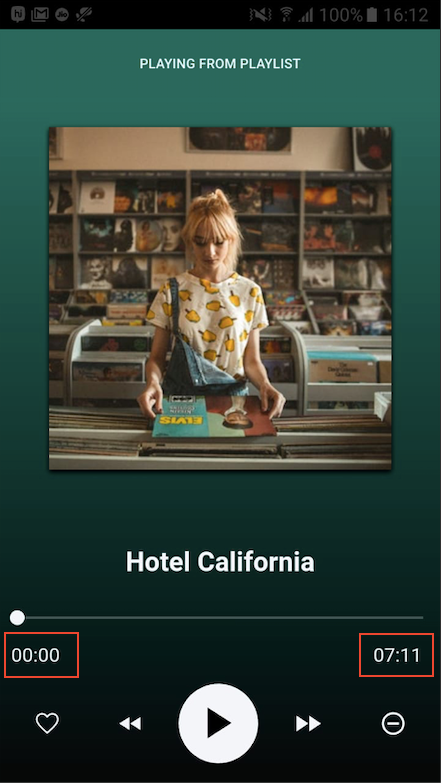
This method is used to get the total length of the audio file, so you can brandish the time in your app (as I've shown in the screens to a higher place). Y'all can get the duration by calling
this.curr_playing_file.getDuration();
But, getting elapsing in the plugin is a little catchy (or I would say hacky). The plugin doesn't give abroad elapsing straight at the starting time phone call. There are two things to annotation
- If
getDuration()is called right later on media is created, the duration returned will exist -ane - If
getDuration()is called without playing the media file fifty-fifty in one case, the duration returned will all the same be -1. To avoid this, the hack we utilise is :
- Create the media file as usual
- Play the media file, but go on the volume to
0by callingthis.curr_playing_file.setVolume(0.0) - Telephone call
getDuration()in a loop (sadly, yes) until you detect a seemingly valid value of elapsing for the song. Following is my code to go the duration
Getting duration takes some time. Hence, equally a UX feature you tin can keep the Play push disabled till the elapsing is obtained. And show a nice little loader somewhere to let the user know what is happening.
Note — Practice not forget to clearInterval in one case the elapsing is obtained. Otherwise the loop volition go on forever.
GetCurrentPosition
getCurrentPosition is pretty cocky explanatory. It tells you lot the electric current position of song, in seconds. Over again, this has a hacky implementation. I hope every bit the plugin improves, this method would meliorate to have a not-hacky solution.
Notice the toHHMMSS() function I have used for converting seconds into a mm:ss format. This is what you would like to show to your users, instead of an integer value in seconds, as shown below.
SeekTo
Because a great music thespian has the power to jump to a item time in the song, our plugin too has that capability. The seekTo() method allows users to bound to any moment in the song using the seekbar.
I have implemented the seek bar every bit an Ionic Range component, where the position of circle is controlled by the ngModel . We can update the position variable using the values from getCurrentPosition() method.
<ion-range min="0" max="{{elapsing}}" [(ngModel)]="position" color="light"></ion-range> I have implemented a FastForward and a Rewind button to demonstrate this function. The associated lawmaking goes similar this. E.g. Rewind button with call controlSeconds('back')
Terminate
When the song is over, we need to stop it. That's why the plugin has this method to stop the audio playback. Notice that stopping the vocal does not release it from the memory in Android.
this.curr_playing_file.getDuration();
Release
Releases the underlying operating organization'due south sound resource. This is particularly of import for Android since in that location are a finite corporeality of OpenCore instances for media playback. Applications should call the release function for any Mediaresources that is no longer needed.
onStatusUpdate
This is subscribe performance. With this, we tin subscribe to the condition of the song — whether it is playing, paused or stopped. This is useful when we want to change the play push button to intermission, and vice versa.
Footstep four — Integrate Capacitor in the app
Capacitor can be fastened to an existing Ionic app too. To attach Capacitor to your existing Ionic app, run
$ ionic integrations enable capacitor This will attach Capacitor to your Ionic app. After this, you have to init the Capacitor app with
$ npx cap init YOUR_APP_NAME YOUR_APP_ID
You should already be having YOUR_APP_NAME and YOUR_APP_ID in config.xml . Use the same here, so that there is no mismatch or confusion.
Step 5— Exam on Android
Now that everything is set up, we need to build this app for Android. Why ? Because Cordova plugins do not work on browser 😆. Merely the good matter is … Cordova plugins work with Capacitor 😎
Earlier adding a platform to Capacitor, you need to build the app once. Build the app using
$ ionic build Now add Android platform (or iOS)
$ npx cap add together android
This should add together Android platform to your project.

Source: https://enappd.com/blog/play-music-in-ionic-capacitor-apps/112/
Posted by: petriagge1969.blogspot.com
0 Response to "How To Install Snap In Capacitor"
Post a Comment